Friday, September 25, 2015

iPhone data recovery:iPhone6/6S lost contacts recovery


Apple iPhone 6 and iPhone 6 plus is the most popular smartphone nowadays, Many apple fans choose to make an upgrade from old iPhone 4/ 4S/ 5/ 5S to iPhone 6 or switch their android phone to new iPhone 6 plus. We all know that it is easy to lose or erase iPhone data like contacts, message, photos and so on. So when using new iPhone, you will also encounter the same problems: your contacts or message are deleted or removed accidentally, and you are eager to get back the deleted contacts and SMS on your iPhone 6. How?  First please calm down and keep reading this article. Here, we will show the best and fastest way to recover lost/deleted contacts, notes and transfer back to your iPhone 6/ iPhone 6 plus. 


The best and fastest way to recover iPhone 6 deleted file is by using an iOS data recovery software, which can directly scan your iPhone 6 and retrieve the hidden data in a few minutes, its also very safe, you can free download the iPhone 6 data recovery on computer and get the recovery job done offline to protect your private data. if you have backup file, you can also select to extract data from back without restore the whole backup.

If you have backed up your iPhone to iTunes or iCloud, you can recover the contacts by restoring your device but that will erase the existed data on your iPhone. If you don't have backup, you may need to recover data from iPhone directly without any backup files. And an iPhone data recovery software can do this for you, PhoneRescue, is the most advisable way to go.


This iPhone 6 Contacts Recovery software is the best iOS Data Recovery can help you easily recover contacts data that you thought you'd lost forever, such as Camera Roll, Photo Stream, Photo Library, Message Attachments, Call History, Calendar, Notes, Voice Memos, Reminders and Safari Bookmarks! It offers you three kinds of recovery mode to recover data from iPhone, iPad and iPod touch: to recover data directly from the iOS device and to retrieve previous data by extracting it from iTunes and iCloud backup!

To get back deleted messages from iPhone 6, there are three ways for you: recover messages directly from iPhone, restore iPhone messages from iTunes backup and retrieve iPhone text messages from iCloud backup.
Tips: You can use this ios data recovery to recover deleted messages from iPhone 6 directly.


Download Mac Version Download Mac Version 
Part 1: Directly recover lost or deleted contacts from iPhone 6 Plus, iPhone 6 and iPhone 5S/5C/5/4S/4/3GS

If you didnt have backup, this mode is the best choose to restore iPhone deleted iMessage.
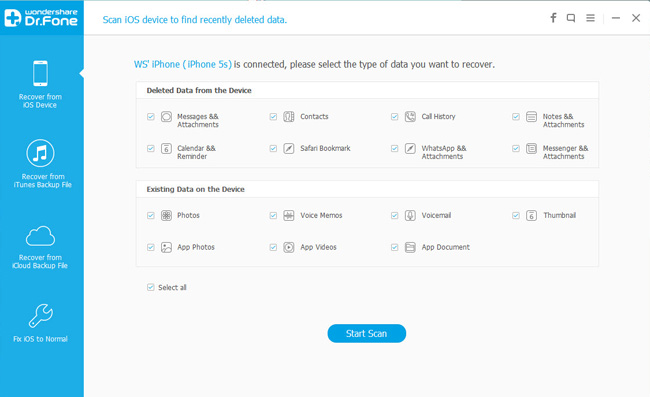
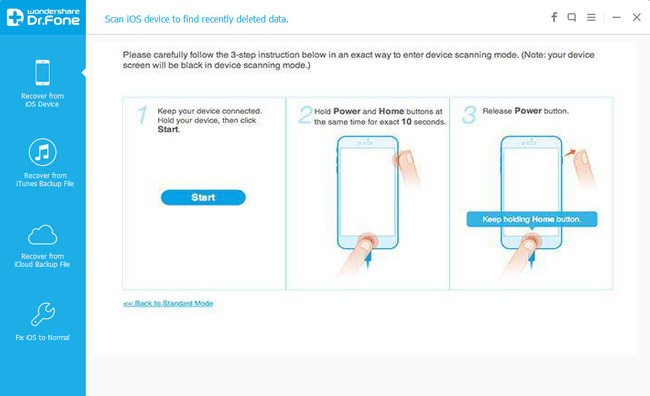
Step 1 Choose Recover from iOS Device” mode

After installing iFonebox, launch it and connect your iPhone 6 plus to Mac, then you will see the interface as follows. Choose Recover from iOS Device” as the recovery mode.

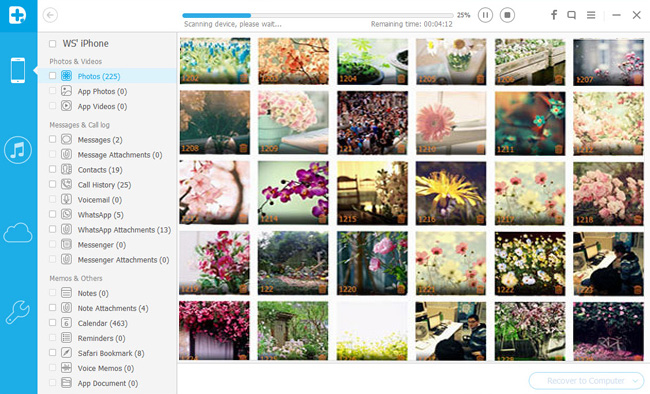
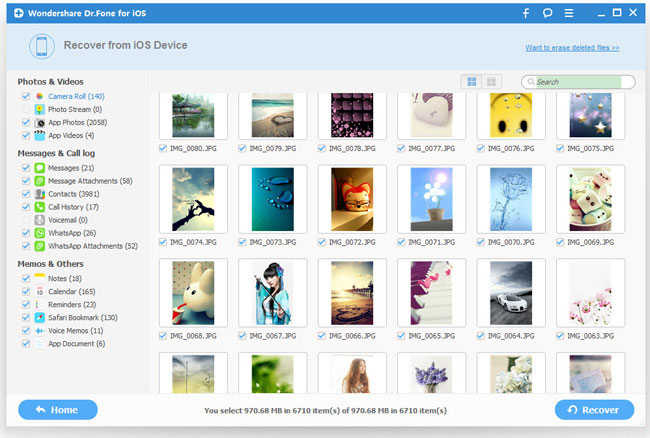
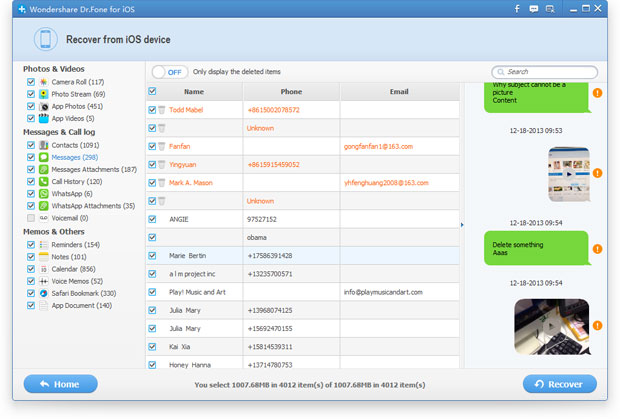
Step 2 Preview and selective to recover contacts from iPhone 6 plus

The Dr.Fone iOS Data Recovery will automatically scan your iPhone 6 plus, Scanning time depends on the number of the files on your iPhone. when scanning finished, all data found on your iPhone 6 plus will be categorized and displayed in front of you. You can click Contacts” to check which you want, All the files include deleted and existing message displayed here. Then mark those what you want and click Recover” to save them on your Mac as csv and html format.


Part 2: Access to iTunes backup to restore iPhone contacts
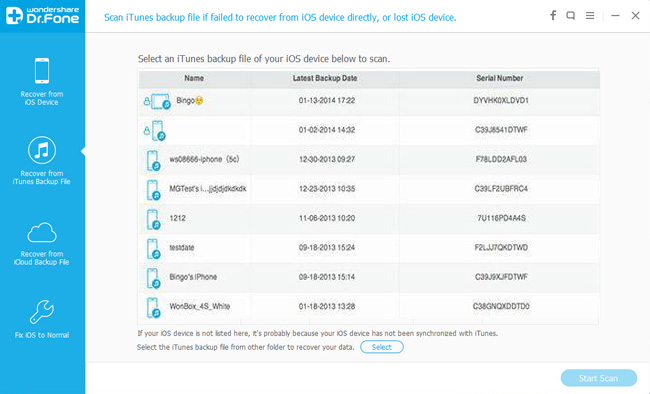
Step1. Choose Recover from iTunes backup” and select a backup file for your iPhone

Lunch the ios data recovery and choose Recover from iTunes backup, all the iTunes backup files which you have synced your iPhone/iPad/iPod with this computer will be found and displayed here. Select the one you need and hit on Start Scan” to get the details.

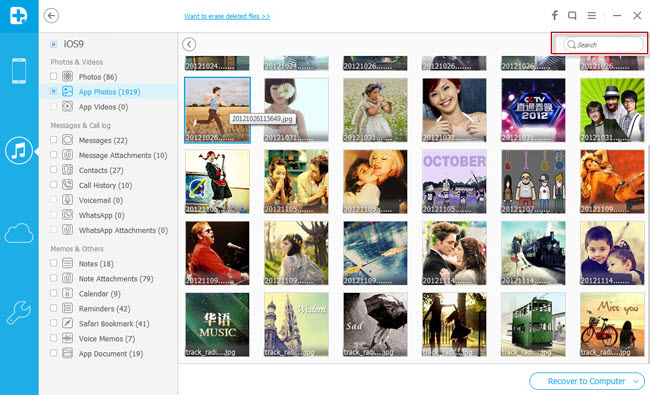
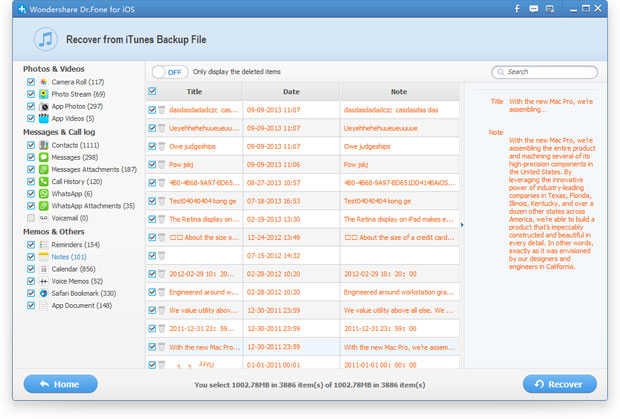
Step 2. Preview and selectively recover the deleted contacts

After scanning finished, all files in iTunes backup are extracted including camera roll, contacts, iMessage, notes and so on. Click the Contacts” to preview the contents of the messages. Tick off those you want and click Recoverbutton to save them all on your computer as readable file format.


Tip: You could do some edit before transfer contacts, notes back to your iPhone 6. Choose one deleted contact, and click the Edit” on the bottom right of the interface to edit and add the content of this contact like name, number, address, birthday, etc. Then click Save” to sync it back to your iPhone.


Download Mac Version Download Mac Version 
Whats more about the iPhone data recovery:

How to Recover iPhone lost videos

How to recover deleted videos from iPhone ? Read this post to know a powerful iPhone data recovery tool –iPhone data recovery


8 megapixel built-in camera and fantastic retina display makes iPhone 5/5s/5c become a nice tool to record our colorful life and watch the videos purchased from Apple store or taken by ourselves. This is so pleasure, unfortunately, you may lose these lovely videos due to many reasons, like:

- Human errors

- Failed jailbreak

- Unsuccessful iOS upgrade

- Device crash, stuck

- Device lost, damaged, broken

- Factory setting restoring

No matter which situation you come across, you may lose those videos from your iPhone  and you can't get them back in normal methods. Fortunately, in this post we will introduce a totally new iPhone data recovery tool and offer you a step-by-step tutorial to recover deleted videos from iPhone  no matter how despair situation you are struck in. Next let's get acquainted with the software we will use.


Please download the free trial version below to recover your deleted video on iPhone. Try it for free!

Download Mac Version Download Mac Version 

First of all: Don't sync your iPhone with iTunes anymore after you find that your video is lost, otherwise, the backup file will be updated and then you can't get back the lost video. And don't use your iPhone for anything, if you want to directly scan and recover videos from your iPhone.

Part 1: Scan and extract iTunes backup to recover videos for iPhone

Step 1: Select the device backup to scan
When running the program on your computer, you'll get the interface as follow. Now you are in front of the backup files for the device. Just choose the one of your iPhone and click the "Start Scan" button to extract the content from your iPhone backup file.
Note: The number of backup files you can get here depends on how many Apple devices you've synced with iTunes before.


recover iTunes data

Step 2: Recover deleted iPhone videos After the scan, the whole backup content are extracted and also displayed. You can check the video which is in .mpeg format in general, and click "Recover" on the top menu to store it on your computer. 

recover iphone notes

In order to avoid losing your iPhone video, immediate backup is very useful and necessary. Every time when you shoot videos with your iPhone, do remember to backup them on your computer first.

Part 2: Directly scan and recover deleted videos from iPhone 

Step 1: Connect your iPhone to the computer
Launch the recovery software on your computer, and connect your iPhone to the computer with a digital cable. When your iPhone is detected, an interface as follow will appear. Here are three recovery modes: Recover from iOS Device, Recover from iTunes Backup File or Recover from iCloud Backup File. Choose the first one and move on.


Step 2: Enter the DFU mode and scan iPhone
According to the guide in the interface, begin to enter the DFU mode with your iPhone:

1. Hold your iPhone and click "Start" button.
2. Pressing "Power" and "Home" buttons simultaneously for 10 seconds.
3. After 10 seconds, release "Power" button, but keep holding "Home" for another 10 seconds.
When you're told that you've entered the DFU mode, release the "Home" button, and the program starts to scan your iPhone as follow.


Step 3: Preview and recover deleted videos from iPhone
When the scan is completed, all your data on your iPhone or lost from iPhone are found and listed in organized categories. To find your videos, check the "Camera Roll", which contains captured pictures and videos. Mark those you want and click "Recover" button at the bottom to save them all on your computer with one click.

Note: you can find the deleted data and those data still on your iPhone. If you only want back the deleted ones, you can refine the scan result by using the slide button at bottom to only display deleted items.


Download Mac Version Download Mac Version 

How to recover iphone lost data


In some instances, it is necessary to perform a factory reset of your iPhone or iPad, as follows:

- iPhone/iPad display freezing
- iPhone/iPad affected with virus
- iPhone/iPad does not detected by or appear in iTunes
- iPhone/iPad cannot sync with iTunes on PC or Mac
- iPhone/iPad wont turn on and does not respond to tape or button press
- Hand over or sell old iPhone/iPod in order to upgrade


“I restored my iPhone 4S last night because I was having issues. I want to restore it from backup, but it wouldn’t sync with iTunes for some reason. Is there any way to recover iPhone data after factory reset?

Fortunately, the answer is yes. All you need is a professional iPhone/iPad data recovery software. iPhone Data Recovery for iOS is such a tool for users to recover iPhone/iPad data after restore. It can recover lost contacts, messages, call logs, WhatsApp history, photos, videos, and notes directly from iPhone or iPad without backup. If you have recently iTunes backup, the program can selectively retrieve files by extracting data in the backup.


Dont worry! iOS Data Recovery tool can solve your problems! This program is a professional data recovery for iOS users, it not only supports recover media files: Contacts, video and Pictures, but also recover other files including SMS, Call History, Calendar, Notes, Voice Memos, Voice Memos, iBooks reading, Reminders and Safari Bookmarks etc. Free download and install it on your Computer below. This free trial version allows you to extract and preview all the iPhone content in details.


Download Mac Version Download Mac Version  


Part 1: How to Recover Lost Data from iOS Devices Directly
This recovery mode allows you to scan your iPhone/iPad/iPod devices directly to find all the lost files recently, or recover lost data from your inaccessible device.

Step 1: Connect your iOS device to the computer
Download, install and run iOS Data Recovery. Connect your iPhone/iPad/iPod to the computer via a USB cable. For iPhone 6 plus/6/5S/5C/5/4S, you'll get the following interface.


If you use an iPhone 4 or iPhone 3GS, the window will be different:

Step 2: Enter DFU mode to scan your device
if you use an iPhone 6 plus/6/5S/5C/5 or iPhone 4S, you can directly click on the "Start Scan" button. For other iPhone models, before scanning your device for lost data, please follow the steps below to get into DFU mode.

1) Hold your device and click "Start" button in the interface of iPhone/iPad/iPod Recovery.
2) Hold "Power" and "Home" buttons on your device at the same time for exact 10 seconds. The Software will count time for you. Just hold the two buttons immediately after step 1.
3) When 10 seconds passed, release the "Power" button right away, but keep holding the "Home" button. After another 10 seconds, youll be informed that youve successfully entered the DFU mode and you can release the "Home" button now.

Then the software begins scanning your device automatically for lost data, and youll get the interface as follow.


Step 3: Preview and selectively recover files
After the scan, all found data are displayed in categories, like contacts, messages, message attachments, call history, camera roll, photo stream, photo library, calendar, notes, reminders, voice memos and safari bookmark. You can preview full contents of all of them one by one.
recover iphone photos

Recover lost Contacts from iPhone

When the scan finishes, you can preview all found data before recovery. Click "Contacts" to preview, you can mark the contact you want to get back and click "Recover" button to save all the contents on your computer with one click.

recover contact from iphone


Recover SMS from iPhone

After the scan, all found data will be listed in clear, organized categories. Click "Messages" to preview the detailed content step by step. Select those you data you want to get back and click "Recover" button to save them on your compute with one click.

recover SMS from iphone

Noes: If you want to recover all of them, you can choose them all then click "Recover" button to save them on your computer with one click.

If you just need to restore your deleted data, you can refine the scan result by sliding the button in the red area on the interface above, only displaying the deleted items. Mark them and press "Recover" button to recover them.

Tips: When the scan finishes, all found data are displayed in categories, like messages, message attachments, contacts, call history, camera roll, photo stream, photo library, notes, calendar, reminders, voice memos and safari bookmark.

Download Mac Version Download Mac Version  

Part 2: How to Recover Previous Data by Extracting it from iTunes Backup
This recovery mode allows you to recover your previous data by extracting iTunes backup. No matter your deleted/lost your iPhone/iPad/iPod data, or lost your iOS devices, his recover mode can help you find your previous data back from iTunes backup files.

Step 1: Select iTunes backup file to scan
When launching the program, you'll be lead to the "Recover from iOS Device" mode (the default mode). Select "Recover from iTunes Backup File".

recover iTunes data


All your iTunes backup data of your iPad, iPhone or iPod touch which has ever synced with iTunes on your computer will be automatically found and listed here. Select the one of yours and click "Start Scan" button to begin iTunes backup extracting.

Step 2: Preview and restore previous data
When the scan finishes, all your files backed up by iTunes can be found and displayed in categories. You can preview them one by one before recovery.
recover iphone notes

Recover iPhone Notes from iTunes backup
After the scan, you can check and preview details of your iPhone notes, and save it on your computer by clicking "Recover".
Then you can selectively mark and recover those you want by pressing "Recover" button at the bottom.

recover iphone notes

Note: If you want to recover them through this recovery mode, please remember not to sync your device with iTunes when you realize that you've lost data, or the iTunes backup file will be updated after the sync.
Now, download this powerful program to recover your iPhone/iPad/iPod data.

Besides recovering iPhone data, you could transfer iPhone data to PC using iOS Data Recovery, which is quite necessary if you want to update iOS or jailbreak iPhone.

There are more guides for recovering iPhone lost files.


Thursday, September 24, 2015

How to Restore Notes from iPhone on iOS9


What the flip Apple?!
I updated my iPad Air 2 to iOS 9 today. It included an update to the Notes app.
Somehow, the update has exchanged all the Returns in my nicely organized lines of text, for spaces.
Now I have to go through 100+ notes and put the line breaks back in, so all my separate lines of information aren't one big glob of text at the top of the note.-Kate

Actually, when we mistakenly deleted notes on the iPhone, you still can undelete them. If you 
want to know how to recover notes in an effective and secure way, you should read this article.

Generally notes are still there at the moment when you deleted them, unless you write lots of new data on your iPhone to overwrite them. Hence, you'd better power off your iPhone or set it into the flight mode, so that you can get a greater chance to undelete notes on your iPhone. This tutorial will show you how to recover notes on iPhone with a powerful recovery software: iPhone Data Recovery (Mac) or iPhone Data Recovery (Windows). let's try to undelete iPhone notes with iPhone Data Recovery (Windows). Download the free trial version below to have a try for free, then install and launch it on Windows. If you're a Mac user, you also can take similar steps with the Mac version of the program.


Download Mac Version Download Mac Version  

Now, please follow the tutorial to recover iPhone notes.

Step 1. Choose a recovery mode
Running the program on your computer, then choose a recovery mode here: Recover from iOS Device, which allows you to directly scan your iPhone to recover notes.


Step 2. Enter the iPhone's scanning mode and scan your iPhone
If you are the iPhone 6 plus/6/5/5c/5s/4s user, you can click the "Start Scan" button to scan your phone directly. For iPhone 4/3GS user, to scan your iPhone, you need to get into its scanning mode at first. You can follow the description in the program's window or the list below to do it:

1) Hold your iPhone and click the "Start" button.
2) Press "Power" and "Home" buttons simultaneously for 10 seconds.
3) After 10 seconds, release "Power" button, but keep holding "Home" for another 15 seconds.
Then the iPhone Data Recovery will scan your iPhone by itself after you get into the scanning mode.


Step 3. Preview and recover notes from iPhone
In fact, you can begin to preview the scanned data when the scan is in progress. At the left side, there are categories of the data found on your iPhone. Click Notes to preview details. Select what the note you want and click "Recover" to save them on your computer. Now, your iPhone notes are undeleted.

recover SMS from iphone


Note: You can found both deleted data and those still on your iPhone here. If you only want to see those deleted ones, you can separate them by using the slide button on the top: Only display the deleted items.


Just download and install it, hope you can enjoy it.

Download Mac Version Download Mac Version  


How to Recover iPhone iPad Lost Data After Update to iOS 9?

The iPhone iPad iPod Data Recovery can not only backup all data from iPhone, iPad, or iPod touch to PC/Mac and iTunes, but also allows user to recover iPhone lost data after upgrading to iOS 9,and it supports recover lost contacts, text messages, photos, calendar, notes, call history, videos and more from iPhone, iPad and iPod in iOS 9 with three simple ways: Directly recover from iPhone, iPad and iPod in iOS 9 without backups, extracting to recover lost data from iTunes or iCloud backup files lost due to iOS 9 update.


Friday, September 18, 2015

How to Downgrade iPhone iPad iPod Touch From iOS 9 to iOS 8(8.4)

[Summary]: This use guide teach you how to downgrade your iPhone 5s from iOS 9 back to iOS 8.4.1 for example,once lost data after iOS 9 upgrading or downgrading,you can use a iOS 9 Data Recovery to recover lost data from iPhone after iOS 9 update/downgrade,it allows you recover lost contacts,text messages, photos, videos,ect from iPhone on iOS 9/iOS 8.

Want to downgrade iOS 9 back to iOS 8.4.1? You can do that, as long as you move fairly quickly. If you have an iPhone, iPad, or iPod touch that has been updated to iOS 9 and decided it’s not for you for whatever reason, you can revert back to the prior release. Maybe you felt the update runs slower, maybe a necessary app isn’t yet compatible with the new iOS, or maybe you just preferred the prior version of iOS, the reason for downgrading doesn’t matter.

A few things to keep in mind here: downgrading only works as long as Apple signs the prior version of iOS, which is typically a short window. Also, you can’t restore an iTunes backup from a new version of iOS to an older version of iOS, so you may lose your data by doing this. You can try an iCloud backup which tends to be a bit more lenient for versions, but it’s not a guarantee. By downgrading and staying on the prior version, you may have to accept losing For the best results, you’ll move quick enough to be able to restore an iOS 8.4.1 backup you made previously to the iOS 8.4.1 device.

Downgrade iPhone iPad iPod Touch From iOS 9 to iOS 8
Before doing anything else, be sure to download iOS 8.4.1 IPSW from here which matches your iPhone, iPad, or iPod touch model. You will need that IPSW file, a USB / Lightning cable, and iTunes to get started. You should also make a backup of your device as it is now if you haven’t already done so.

Read More:

How to Recover iPhone Data After iOS 9 Upgrading

How to Recover Lost iPhone Data After iOS 9 Downgrading

How To Download and Upgrade iOS 9/iOS 9 Beta on iPhone

For Windows Users:

    Make sure that you have the latest version of iTunes.
    Put your device in recovery mode by following these steps:

    Turn off your device and plug it into your computer, while holding down the Home button.
    Keep holding down the Home button until you see Connect to iTunes on the screen.
    When you see this screen, let go of the Home button.
    If you don’t see this screen, try steps 1 through 3 again.
    Hit restore.

    If you turned on Find My iPhone, enter your Apple ID and password after the restore to activate your device.
    If you can’t finish the restore, get help from Apple.
    Once the restore is done, set up your device from the archived backup. This backup should be from an earlier version of iOS.

We’ve also included steps here for your convenience, in case you didn’t archive your iPhone or iPad backup as per Apple’s guide:

    Plug your iPhone into your computer and connect to iTunes. Then, backup all your info. Unplug.
    Download a clean copy of iOS 8.4. Select your device, model, and the iOS 8.4 firmware. Click to download.
    While you’re waiting for that to download, turn off “Find my iPhone” under Settings > iCloud > Find my iPhone. You will need to know your Apple ID and password.
    Once the copy of iOS 8.4 is downloaded, open iTunes and plug in your iPhone.
    Click where it says “iPhone.” Then, click “Check for updates” while holding the “Option” key on Mac or “CTRL” key on Windows. Make sure you hold the key and click simultaneously. This will bring up options for you to choose from when selecting a build.
    You’ll see the file menu. Scroll through until you see the .ipsw file for the fresh iOS 8.4 firmware. Select that file and hit OK.

Now you’re back to the stable iOS 8.4 update you just downloaded a few days ago. You can always go back to iOS 9, if you get curious again, though. Just remember to always back up your info!

For Mac Users:

Are you ready for Downgrade iOS 9 to iOS 8.4? iOS 9 Download links will be released by Apple in June. How to go back to iOS 8.4? If you want downgrade iOS 9 to iOS 8.4 for all compatible idevices, you must understand that is't very simple. How? Read this simple guide from us now:

Step 1: Turn Off + Connect to Mac via USB
Step 2: Launch last version iTunes

Step 3: Enable device into DFU mode:

a) Turn off + Hold down the Power + Home buttons together for 10 seconds
b) Continue holding Home button until iTunes notifies you of a device enable "recovery mode".

Step 3: Restore via iOS 8.4 (last version iOS 8.X):

a) Restore from the iOS 8.4 backup.
b) Restore to iOS 8.4 IPSW by Option-Clicking the “Restore” button.

Step 4: Device will reboot when finished!

Relevant Hot Articles:

Ready Upgrading Your iPhone iPad to iOS 9

How to Recover iPhone SMS after iOS 9 update

How to Transfer Data from old iPhone to iPhone 6s